Wednesday, 8 April 2015

Crochet buttons

Thank you for all your kind messages about my yellow dress, I was pleased some of you may attempt a zip in the future. I found this pretty crochet button on pinterest and just had to make a few to use at my crochet classes.


I have also purchased stick pins to put them on so that they can be used to decorate sunhats, bags, coats etc. I am really getting down my enormous button stash now.


Here is the link on pinterest. Try some, they are fun. Jo x

Monday, 6 April 2015

Channeling my inner yellow

If there is one thing I learnt last year it is that when the sun comes out and the weather warms up the first thing you want to do is put on a sundress to go outside. The last thing you want to do is stay indoors and make one!

I am freezing by the way!
 It is a long work related story but I found myself in Oswestry last week 51 miles from home with a spare few minutes so I visited a fabric shop I had never been to before because it is normally too far away called Textile Express. Ooooh! it was spectacular.


I bought this funky, tropical roll end remnant for £5. Since the purchase of my yellow shoes (slight mistake really) I have been trying to channel my inner yellow. 


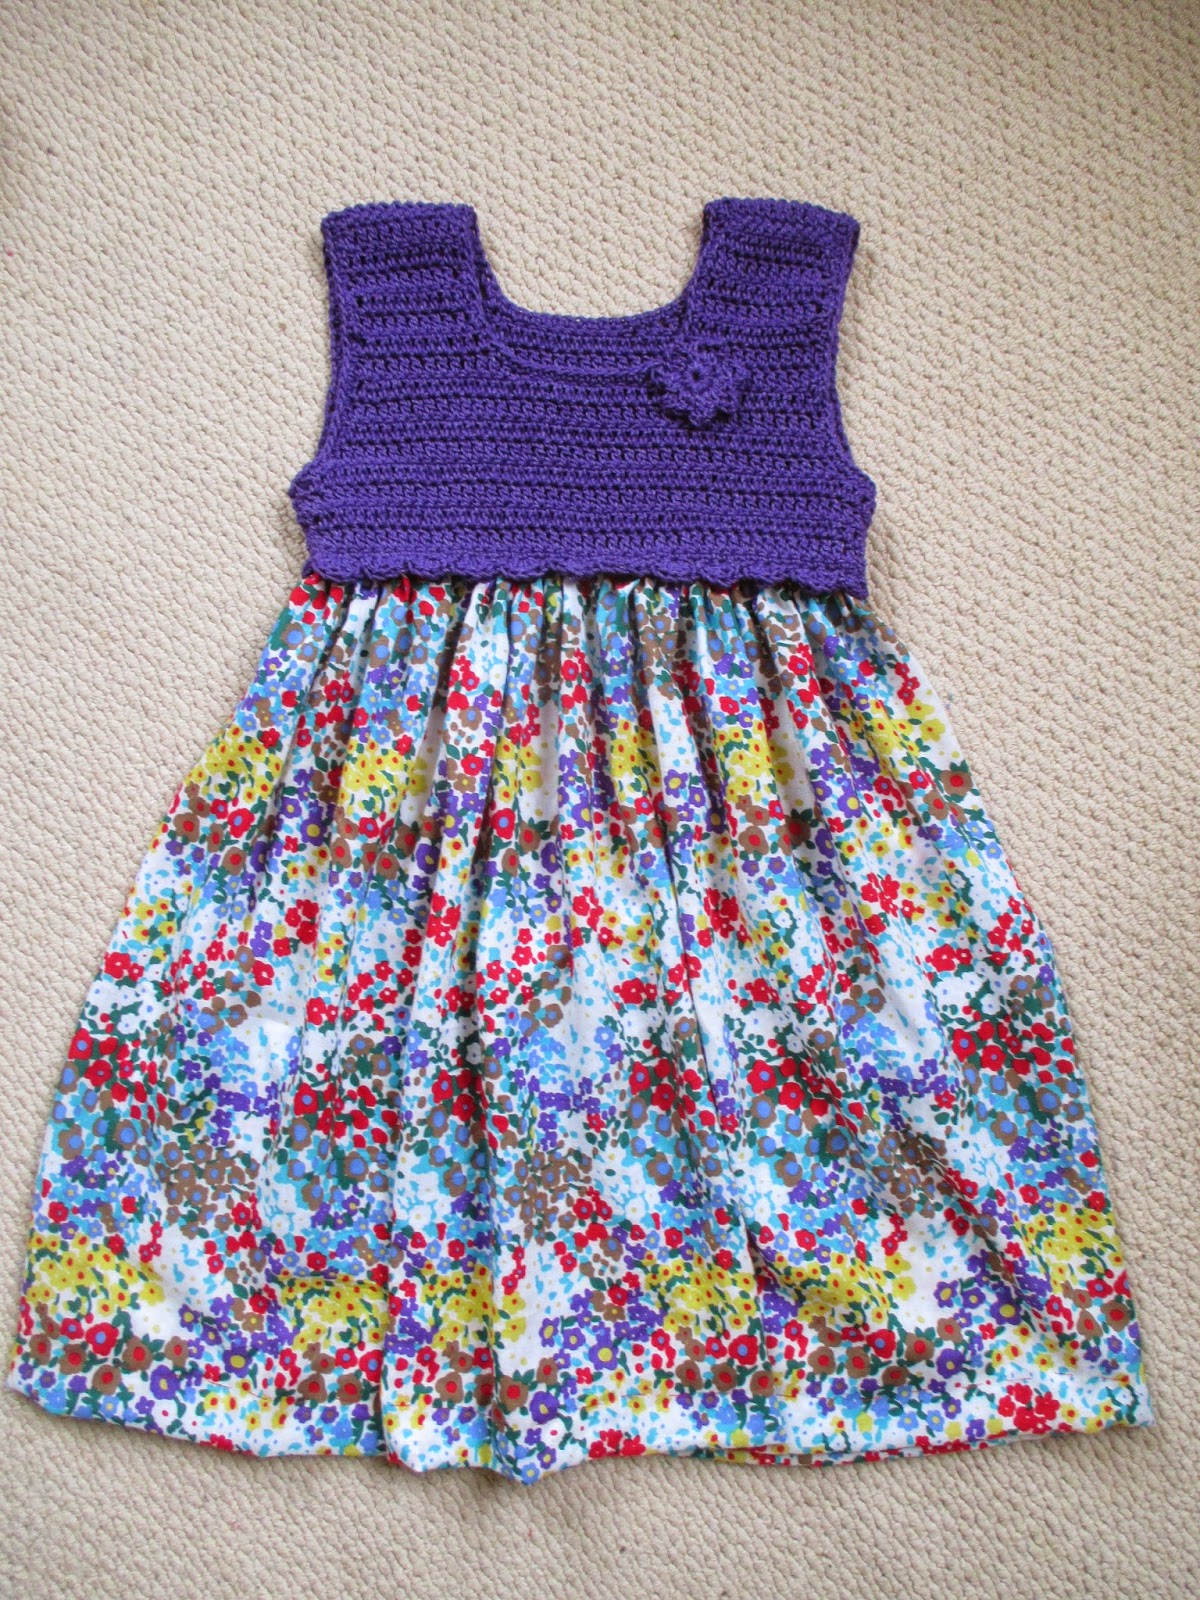
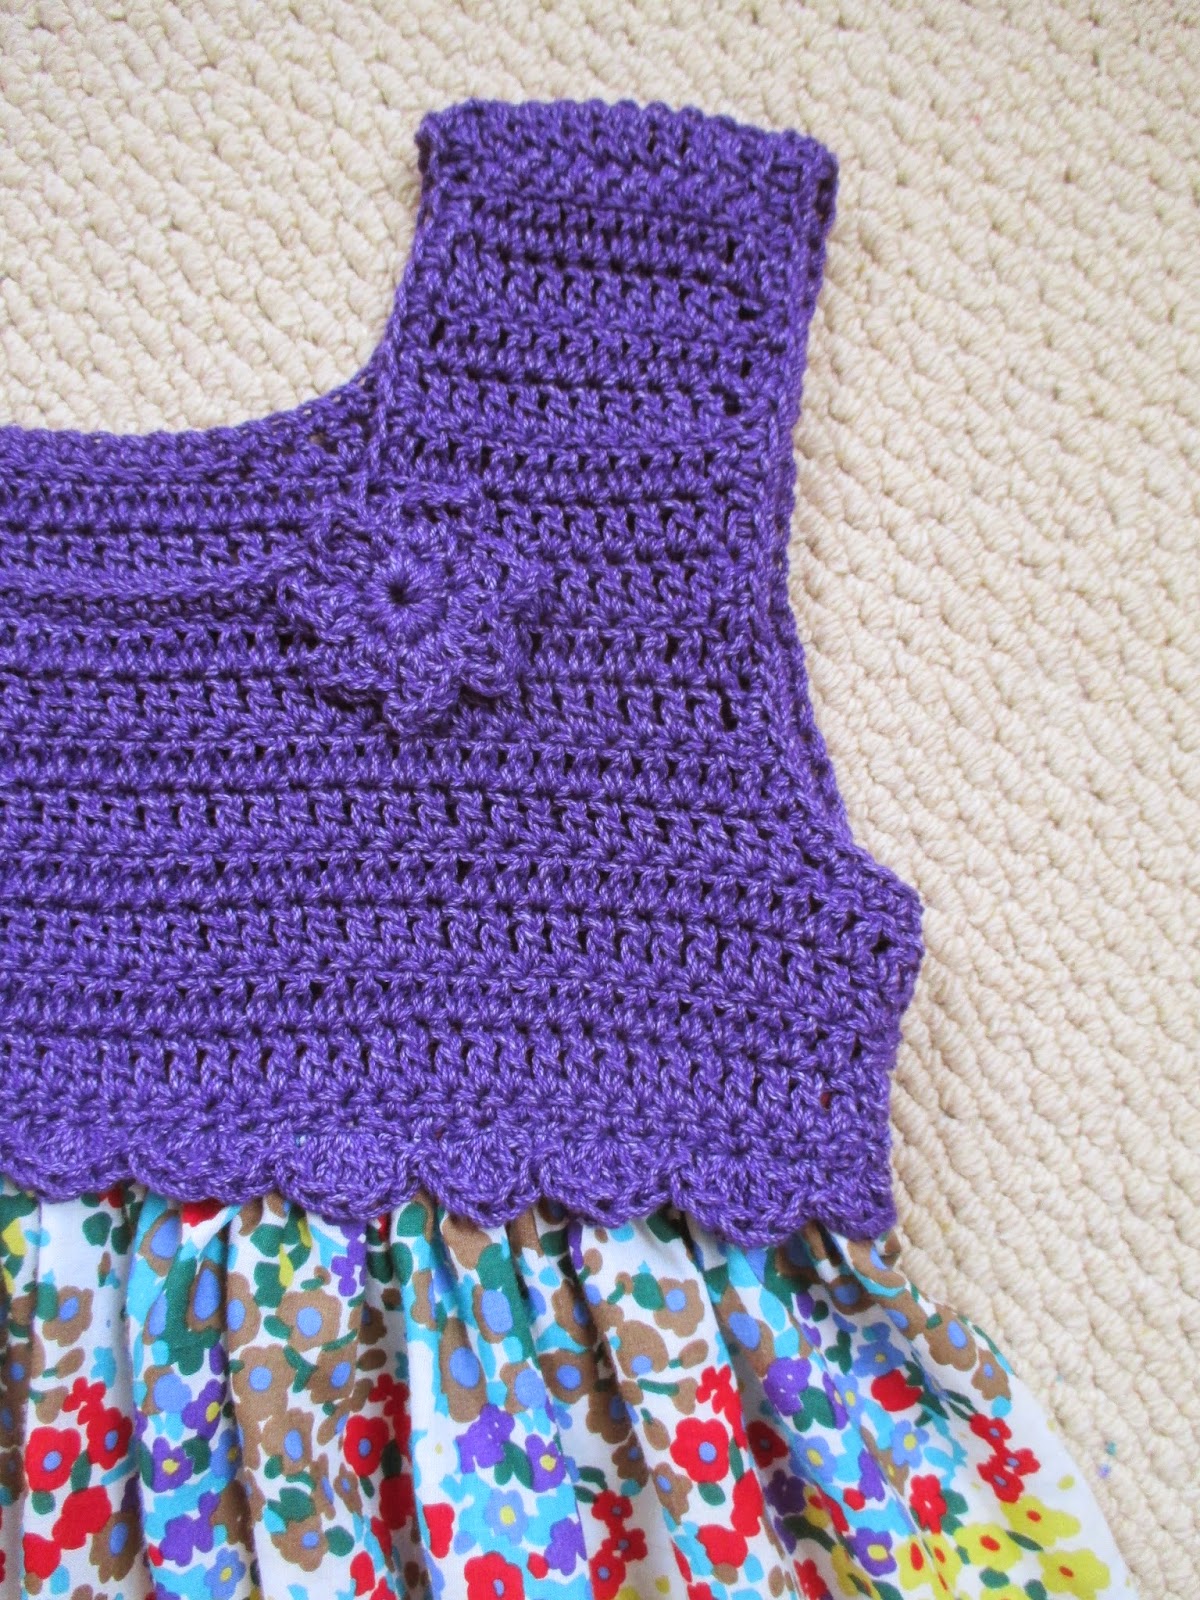
I have been on the look out for the perfect shift dress for a while now and this caught my eye. I have tried so many over the last two years but this is a winner because I can shorten the body at the waist. It is free with Sew Home & Style April issue 70. I made view D with a tie belt.


I can't say that I have done a great deal of pattern matching over my sewing career so this one was a real challenge that also involved bloke getting a bit technical and mathematical to help me out. This was as good as I could get it.


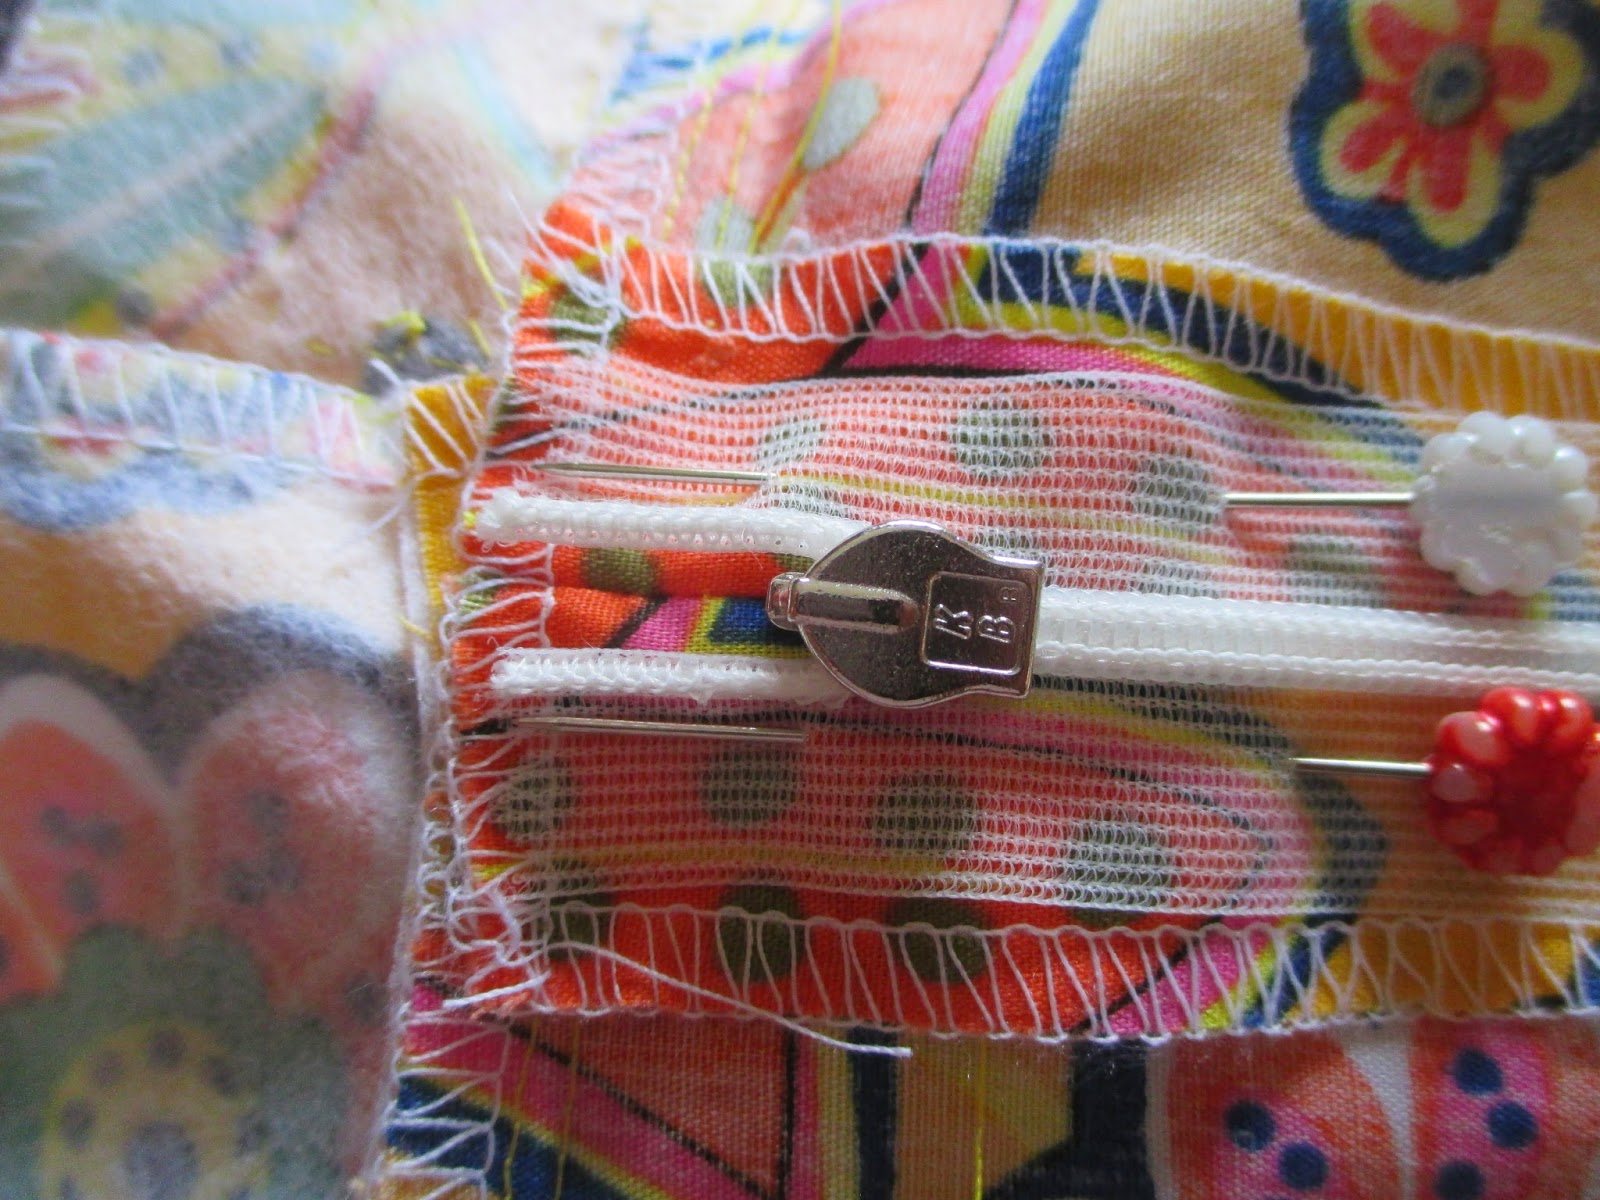
How I insert a dress zip

Fold your back zip seam and pin making sure the top is level. Use a 1.5cm seam allowance but it is best if you have someone fit the back for you. I always have to have less on the waist and more on the hips.


Sew this seam on your machine with the longest stitch setting (basting) making sure you go all the way to the bottom of the back seam joining the two lines of stitching together. Press open.


Pin zip in place using the seam you have just made as a guide to the placement of the zipper teeth. 


TACK IT! this is not the Great British Sewing Bee, take your time. It takes minutes but saves an hour of unpicking. 


Put the zipper foot on your machine and remember to put your stitch length back to normal. Use the back edge of the zipper foot as a guide to run along the seam line as you sew steadily.


Go all the way to the end, turn, and return to the neck stitching both sides of the zip. Nothing should be moving, it is machine basted and tacked in place.


Now run a stitch unpicker up the seam you made in the first place. It has to be sharp otherwise you will need to take more time to unpick it.


You can now undo the zip, try it on and then pull out the little basting whiskers.


Finally, depending on the garment, you can fold down the back neck facings and hand stitch them in place ensuring the zip can still flow to the top. You may need to add a hook and eye at the top too.


So don't be frightened of zips. Give this way a go.


Yep, I am starting to get in touch with yellow. Thanks for looking, I hope the eye-popping colour wasn't too much of a strain. 

Jo xxx


Friday, 3 April 2015

Hooray! Summer dress

OK so she hated the crochet version but then I was a dress behind in the whole sisterly-fairness thing so I made this one. She has been asking for it for ages because she liked the frilly sleeves.


The fabric is from Textile Express. It is a flippy viscose perfect for the fluted sleeves with a rolled hem edge.


I asked her to do a pose so she did a ballet one because that was the only one she knew. Aww!


The sleeves are fluted and are split nearly to the shoulder which you can't quite see. I used a the rolled hem foot on my machine for a quick even finish.


The dress is lined with a top stitched neckline. The button fastening is made from embroidery thread with hand stitched loops.

The equilibrium has been re-set. 

Sunshine please! Jo x


Wednesday, 1 April 2015

A little light crochet

Heart Keyring number two, created as I showed my group how to decrease double crochet. The pattern is here and very simple.


 Some very lazy, lazy-daisy stitch...(not very proud of that!)


Happy Wednesday. Thanks for looking. Jo x


Saturday, 28 March 2015

FREE Crochet dress Tutorial

I normally say Hooray when I make something but the recipient wouldn't wear it! Little M said, "It makes my tummy look like a square shape,"... whatever that is supposed to mean.


I looked around ravelry for a dress top pattern but they all used too much yarn. I had 2 skeins of Louisa Harding Jesse left over from my cardigan and it needed using up. I don't like stash collecting, it clutters up my basket. 


I even bought the fabric specially to finish it off and match the yarn from Textile Express in Oswestry. 

So you guessed it, I made one up as I went along in two evenings and managed to scribble down a 'recipe' just in case you have yarn or a small girl crying out for a summer dress.


4mm Hook
Cotton DK 2x50g skeins(approx 180m)
UK terms used
Size shown is for a 6 year old
Make your own size adjustments

Foundation chain: Chain 49 loosely

Row 1: Ch1, miss a chain, dc to end of the row

Row 2: Ch3, treble to end (48)

Row 3: Repeat row 2

Row 4: Repeat row 2 (lengthen your bodice here if required)

Row 5: Shape armhole. SS3, ch3, treble to the end leaving 3 stitches unworked. 

Row 6: Ch3, treble to the end.

Row 7: Repeat row 6

Row 8: Ch3, tr2tog, treble to last 2 stitches, tr2tog.

Row 9: Ch3, treble to end.

Row 10: Neckline shaping. Ch3, treble 12, 1htr, 1dc, ss centre front until there are 14 stitches remaining, 1dc, 1htr, treble 12.

Row 11: Ch3, treble 12. Turn

Row 12: Ch3, treble 12, turn

Rows 13-18: ch3, tr12. Fasten off

Rejoin yarn to the other shoulder using a standing treble (if you can) or using 3ch. treble 11. Turn. Repeat rows to match the other shoulder (should be six rows of trebles)Fasten off

Repeat this whole section for the back. You can make the back deeper by adding more rows before the neckline shaping.


Customise
Add your favourite flower, scallop edge, picot edge on the armholes and neckline,thread ribbon through the empire line etc. etc. Then a gorgeous gathered fabric cotton or viscose to finish the bottom.


Her older sister was hanging around in the background ready to snaffle a new dress like a panther. Luckily, I had made a deep hem for letting down later so I made it longer and she loved it.


Hey presto! Do link back if you make one, I would love to see more ideas.


Thanks for spending your precious time with me. Jo xx


Thursday, 26 March 2015

Hooray! vintage dress 1968

My Minerva make this month has been my most successful vintage pattern make yet. It is a pattern that is size 16 for a 36" bust(please!). It was easy to fit by simply altering the back darts for my sway back and chopping the length because I am short. The rest was cut and sewn to the seam allowances so I will definitely be making this pattern again.


The fabric is a lightweight linen with a tulle ribbon sewn on. It is a stunning fabric before you even cut it. It's £6.99 a metre and I used two metres.

I seem to have a pattern placement there that mimics my intestines!
I used the fabric to my best advantage. I loved that ribbon but it looked a bit like it could be scratchy over time so I cut the sleeves using the wide un-ribboned-selvedge edge. It made the sleeve cuffs really smooth especially on my underarm. I did the same on the hem to stop it rubbing away at my tights. You don't know you are going to do these things until you see and feel the fabric but it is always good to have an open mind and be ready to adapt.


I think the Hepburn collar is such a stylish cut.


This is how the body shape is formed. There is a bust dart, and side front darts finished with faux pocket details. Circa 1968. Cool.


It is lined and is one of the most comfortable dresses I have made. I wore it to work and had lots of compliments including "Where did you get that dress from?" I swoon over that sort of comment, it means it doesn't look handmade and I must be improving.


Thanks Minerva.

Another make towards my Vintage Pledge 2015 with Stitching Odyssey

“the


Tuesday, 24 March 2015

More sunshine please

I have been playing around with some crochet techniques for my next run of classes. There was a request to learn to cable but I am not so sure I could pass it on and people would feel successful so I came upon this chain loop cable stitch.


I used cotton scraps to make a sunglasses case for the car. I do much more driving around now with my job and last week I could hardly see out of the scratched ones I found under the seat!


The stitch is so easy but effective. You Dc5, then chain 8, then dc 5, then chain 8, then dc 5. Turn the work and dc all the way back again keeping 15 stitches. When you do the loop row again you thread the loops through each other (you know like children do with loom bands) and this cable pattern appears. It is genuinely exciting.


At the top of each piece I did a straight bit of double crochet only to fold over and insert a 'flexi-frame'. Yes folks, that is what they are called if you are searching the internet for one.


Hooray! a cosy pocket for my sunglasses while learning a new technique. More sunshine please.


Thanks for looking. Jo x