Showing posts with label 2018 Craft resolutions. Show all posts

Friday, 25 May 2018

Sailor Top by Fancy Tiger Crafts

This month my Minerva sewing project has a real summer feel. I have wanted the Sailor top pattern by Fancy Tiger Crafts for a long time. It ticked a lot of boxes for me: it had sleeves, it came over my stomach, it had a flattering neckline, it had a style I see in shops a lot which I really like.


The fabric I chose deserves a thorough review. It is unusual and when you see it here, it has some details which you might not pick up from the website listing. This fabric is however really inexpensive at only £3.99 a metre.


Firstly it is worth mentioning that the applique design is not sewn to the edges, this is fine for me but you have to check you don't get them folded over if they are on the side seam. Also the circles are not all over, they are a border arrangement which makes for fun pattern placement.


The hem is over locked on a wave. Some pattern jiggling is required here. I was not sure at the cutting stage what I would plump for so I made sure I allowed enough to have the original edge as the hem or turn it up and sew across the circles. I cut a UK 12 and graded out for for more hip room (you can see that on the left hand side of the pattern). It is a modification I am always mindful of making.


The applique pattern also needs to be centred and well placed for a blouse, I didn't want to have two nipple circles! The fabric is a light cotton lawn and is a little see through but I have a white bra so all is well. It also comes in a strong royal blue.

Pattern wise it had clear instruction and was easy to follow. The neckline needs care and attention. I put mine on twice. The second time I marked the dots and notches (doh!) because I had too much gather on the sleeve and not enough across the back leading to Edwardian style sleeves and a tight feeling across my back. The second time was so much better and comfortable to wear.


Modifications

In the end I went for a sloping front to back hem line which sat just where I wanted in all the right places - that is why we make clothes for ourselves isn't it? I sewed the sleeve hem facings on the outside so that I could have the thread detail on show. 

I loved messing around with the different aspects of the fabric but if you get some, ensure you take your pattern placement into account so that you have enough yardage. A very successful pattern. 

In the meantime I made another without french seams to check the sizing. This one has a better fit around the arms and has been a hit worn with trousers and jeans before high Summer.


On this one I took a tiny wedge out of the back band to avoid a little gaping I had on the white one.


This fabric is a thicker cotton so it will have more outings during the year. I had been trying to use this fabric since last January when a friend gave it to me in a bag of unwanted haberdashery but never found the right pattern - I have now.


2018 Indie pattern thoughts
I really liked this pattern but it is a wallet buster. It is however a pretty timeless shape and style so it will get lots of use. The sizing felt right for me and the instructions were great. I am looking at the rest of the range - maybe one for my Christmas list! There is a free download for a jersey top if you are interested which you can find here which I am going to have a go at in Autumn.

We are off to France for a well earned break tomorrow for a week and the white one is now in my suitcase. Just off to find a portable knitting project for poolside relaxation. Thanks for dropping by Jo xxxxx

Friday, 18 May 2018

Fifi Boudoir Set

Thank you for all of your kindness and messages, they filled my heart. Just changing the scene on my blog today to something light and sunny that I had ready in the background - you know me never short of anything to show!

When I say this is my favourite indie pattern, I am not exaggerating. This is my fifth set: two I have made as gifts, one for me with long bottoms and another version I made using the top pattern to make a swimsuit hack. I love the detail which is such a joy to sew on the machine. The instructions give such clear seam allowances for each stage that everything just falls into place all with enclosed french seams.


The pattern is however a bit of a fabric pig by which I mean it gobbles up a large piece. To combat this you can use bought bias binding which saves cutting large strips out of your fabric on the bias.

The pattern does warn against fabrics with a stripe because the top is cut on the bias and the shorts on the straight grain but I got away with it in this background stripe. The fabric was donated last year in a fabric bag. 

I got a chance to use my bias binding foot which makes for a neat finish on the edging. Another foot used for my 2018 resolution list.


 An exceptionally pretty set for my Summer holiday suitcase which will be packed in a weeks time.


I did say I had been sewing a lot in the rainy Easter holidays!

Do you have a pattern you use over and over again? Jo xxx

Sunday, 22 April 2018

Meet Lucky my King Sized Quilt

I have named this quilt 'Lucky'. I like to name my quilts on their completion because they become part of me; they grow their own personality. This is called Lucky because I have been so lucky to have been given such lovely fabrics by some fantastic people.


I spy some fabrics from some great bloggers: Christina, Amy (formerly of Love Made My Home),CJ and Helen


I spy fabrics from my Auntie Shirley

I spy fabrics from a work colleague whose elderly mother went into a home and couldn't take it with her


I spy fabric from my neighbour who has carpol tunnel and is unable to sew anymore and another neighbour who was having a clear out from her 1980s Laura Ashley off cuts.

I spy fabric Bloke bought me for my birthday and some of his old shirts


I spy fabrics given to me by companies as samples at shows.

I spy little snippets of all the clothes I have made for us over the last few years: bits of Liberty, school gingham skirts, pump bags, skirts, dresses and so much more.


Lucky takes on a different look at different times of the day, I like popping my head round the door to take a peek in the early evening especially.


Details
It is made up of 252 dresden star blocks. You cut a rectangle 14cm X 20cm and then cut it on the diagonal. Next you use (or make out of card) a dresden template to make the shape in the middle plus seam allowances. 

There are 1008 pieces in this quilt. 252 x 3! 252 blocks with three pieces in each.


It is hand quilted with embroidery thread. It took four whole skeins in total split down the middle all from Helen Phillips. Time wise that is just over one week of evening hand sewing. The stitches are big to make it: a)possible, b)take out slack and ripples and c)look handmade.


The backing and wadding is the IKEA quilt that was already on our bed. The quilt topper was a few inches smaller all around so I sewed it on with the machine with the help of Bloke holding the weight of it before any hand quilting to keep it steady.I cut off the excess and original binding. The new binding is some I already had from Frumble, I went for the red. I used my binding foot which was a god send.


It is heavy. I don't know how heavy but trust me it is heavy. It keeps us very warm. I took this photo from some scaffolding in the farm yard (a long story) so the background is a dry muddy yard with my family holding it up. It was the only way to photograph such a heavy and large scale object.


Cost: it didn't cost me anything...just my time, love and patience. I did lots of thinking whilst doing it and that, to me, is priceless.

A mahoosive thank you to everyone who contributed, even if I missed you out on 'I spy' - if you did join in with this creation give us a little shout out. Can you see any of your fabrics?


One last thing - I TOTALLY LOVE IT!!!!!!!

Thanks for taking a look. Jo xxx

Monday, 9 April 2018

Denim Sewing All done #18

Today I am writing my 18th all done post. Firstly I made stretch denim jeans, more on that later. I had a piece left over which Big Sis spotted so she persuaded me to make her a dungaree skirt from an Ottobre magazine. I had enough for the main pieces and then used a floral fat quarter for the facings and pocket linings. 


We bought some Prym metal buttons to make it look like the real deal. I grappled with top stitching thread which incidentally needed the tension wheel on my machine to be on 7.5 to get a smooth thread tension. She is all arms and legs this girl!


She wants the T-shirt now! No worries I love sewing for her.

The skinny jeans were a little less photogenic which is why I have written about them second. I have made some simple skinny jeans using the Sew Liberated indie pattern. If you like wearing long tops or tunic button fly jeans can leave you with a lumpy stomach, so I thought this pattern would be pretty useful.From a toile I found out that they had quite a low rise which didn't feel right so I made the body pieces longer by 2 inches. This made for a much better fit. The piece above the yoke is ribbed jersey.


It is hard, and also expensive, to get ribbed cuffing knit fabric strong enough to hold up your trousers so inside the folded over knit fabric around the waist I sewed a piece of wide elastic on a stretch stitch before I folded it in half. This made it super comfortable and a suitable waistband. They are reminiscent of the maternity jeans I wore ten years ago! 

I stitched them together with yellow thread for an authentic look and designed the pocket pattern myself by drawing free hand in chalk and then ironing the other pocket on top to mirror the image. You can simply sew the inside and outside leg seams with a straight seam or go for a flat felled seam on the inside leg and crotch for a durable, authentic finish. 


All done with this stretch denim with two good items of clothing.

In my opinion
I have used sew liberated patterns twice now and I'm afraid I am not a fan of the sizing or the shaping - they require a lot or modifications for me. The patterns are on tissue and do not have enough markings to indicate which size you are cutting. All the lines look the same and lack numbers to show which size you need. The instructions are clear and well written but I have not been happy with the end result on either these jeans or the school house Tunic without the alterations I had to make. In my top ten indie patterns Sew Liberated is near the bottom of the list unfortunately.

Monday, 26 March 2018

Cable Twist Bed Socks

Cafe knitting is still going strong. They know me now on a Thursday. Walking in, they bring me a cappuccino without me even asking. It is the best coffee I have all week. It is good to have a craft-on-the-go project in a zippy bag. Every Thursday I have an hour to kill between work appointments and sock knitting fits the bill perfectly.


These cable knit socks were easy to do but gave a little knitting interest. The yarn is actually Sirdar snuggly four ply which was given to me about six years ago in a gargantuan quantity, probably about ten balls. My mum and I have used it to knit little girl things over the years but my girls have outgrown this kind of pink now so I am using up what is left over to make bed socks as pressies. 


The pattern is FREE from Colourful life and Christina's sock patterns are easy to follow and I highly recommend them.

I got distracted on sock number two and started some new projects. I had to hunker down and do a few more rows wherever I could. I even had a beer in a cafe whilst waiting for a friend one Friday evening. 


Got there eventually! These ones are going into the present chest ready for Christmas(Smug!)They are sporting these rather natty paper bands sourced free online which you can find here.


They are for my friends daughter who will be 18 this Christmas. I have made many things for her over the years, some of which I have had to stand a bit of friendly teasing for, so this band makes a fun finishing touch.


I am sure she won't mind me modelling them just this once, they were so snuggly, it was hard to prise them off.

Thanks for dropping by. Jo xxx

PS. Not knitting related but please, please go and look at a make on this blog - it is awesome!

Friday, 23 March 2018

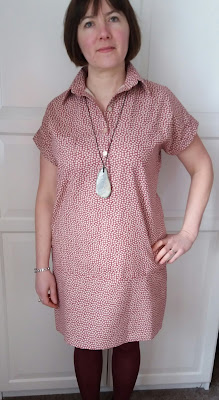
Kalle Shirt Dress

As part of my new years resolution to try out some Indie sewing patterns, this month I have chosen the Kalle Shirt dress by Closet Case from Minerva to share with you.


First up, I must confess, I made a huge cutting error right from the start. The pattern is very versatile and has a selection of choices on one sheet. I accidentally cut the front of the dress and wait for it... the back of the tunic - it was so short at the back I didn't know what to do especially as it has a shirt hem. It is a bit ironic as the dress has a hem with a long back and short front - mine was the other way around! Anyway more on that later...


The 100% cotton fabric was a joy to work with and is just right for a UK summer dress and for this pattern. It is a lightweight cotton canvas with plenty of  movement and drape. It would make a great skirt, shift dress or capri trousers too. I cut it with pinking shears and hardly used my overlocker because most of the seams are cleverly concealed on this pattern.


To construct the yoke you use the burrito method, apparently. It is mighty tricky to understand the instructions for this unless you label your cut pieces adequately...Which is what I did the second time! You birth the whole dress through the neck hole and have an encased double yoke.


I took my time with the collar: to ensure that they were absolutely even I measured and drew on a sewing line with a 5/8" seam allowance. I recommend doing this with any collar. Ta dah! perfectly symmetrical collars.


Really impressed myself there...


Again marking your pieces will enable you to have the under collar on the bottom and the upper collar on the top. The under collar is slightly smaller therefore it stays rolled underneath as shown.


Now back to that hem. I tried cutting them both to the tunic length but in truth it was too short for what I wanted before I had even turned it under. In the end I had to kind of make a bit of a feature of it and have a different hem. I had some left over from clever cutting out therefore I added a band to give it the length I wanted along with some top stitching. The grainline is going the other way but it looks like it is supposed to be like that.


I am satisfied with the end result, if a little miffed with my initial mistake.


As part of my 2018 craft resolutions - I used the buttonhole foot to make five button holes. It is so easy and on my machine, it is all automatic. 


Overall it is the dress I want for airplane travel for our holiday to France in May. A cardy and tights will see me through until then.

Thanks Minerva. Jo xxxx

Closet Case patterns
In my opinion...
I am tagging this one as one of my 2018 resolutions. Closet File patterns are American so I don't always feel too confident about sizing; measuring yourself is a must. The instruction booklet is photographed and clear for intermediates. I think it is a step too far for beginners. No tracing is required but the pattern has layered multiple styles on it which is how I made my error. The pattern is on tissue paper with seam allowances included. The packet is not over complicated or costly. They are expensive but give long lasting styles and in this case more than one garment on this one which I feel is worth the investment. The modelling imagery does not rely on overly slim models which I like too.