Tuesday 29 May 2018

A quilt called 'Summer'


People may think that to make a quilt topper or start some machine patchwork you need huge bags of scraps or a lifetimes collection of fat quarters but there are designs that use very little fabric meaning you can choose something you really love. Using a combination of solid and patterned fabric in a half square triangle (HST)design a very effective pinwheel block can be achieved.


Here, I have chosen three poplin fat quarters, one in each colourway, from the camelot beyond the backyard collection at Minerva. The fabric is a beautiful quality and matches well with their cerise and white solid poplin


Here is the full colour range. Very striking and just right for a not too girly girl. I love the retro 1960's pattern

To make this block you need to follow the cutting list below in cm:

4 16 x 16cm squares in patterned fabric
2 16 x 16cm squares in pink fabric
2 16 x 16cm squares in white fabric
8 15.5 x 15.5 squares as border fillers in white fabric

You need 1m of cerise, 3 fat quarters in pattern and 1.5m of white filler


Place a patterned piece right sides together with a solid piece. Draw a line diagonally from corner to corner then mark a sewing line 0.5cm either side of the centre line.


Sew the two sewing lines each side of the centre line.


Cut the centre line and press out your half square triangles. If you use white fabric ensure you press your seams to the patterned side to stop them showing through.


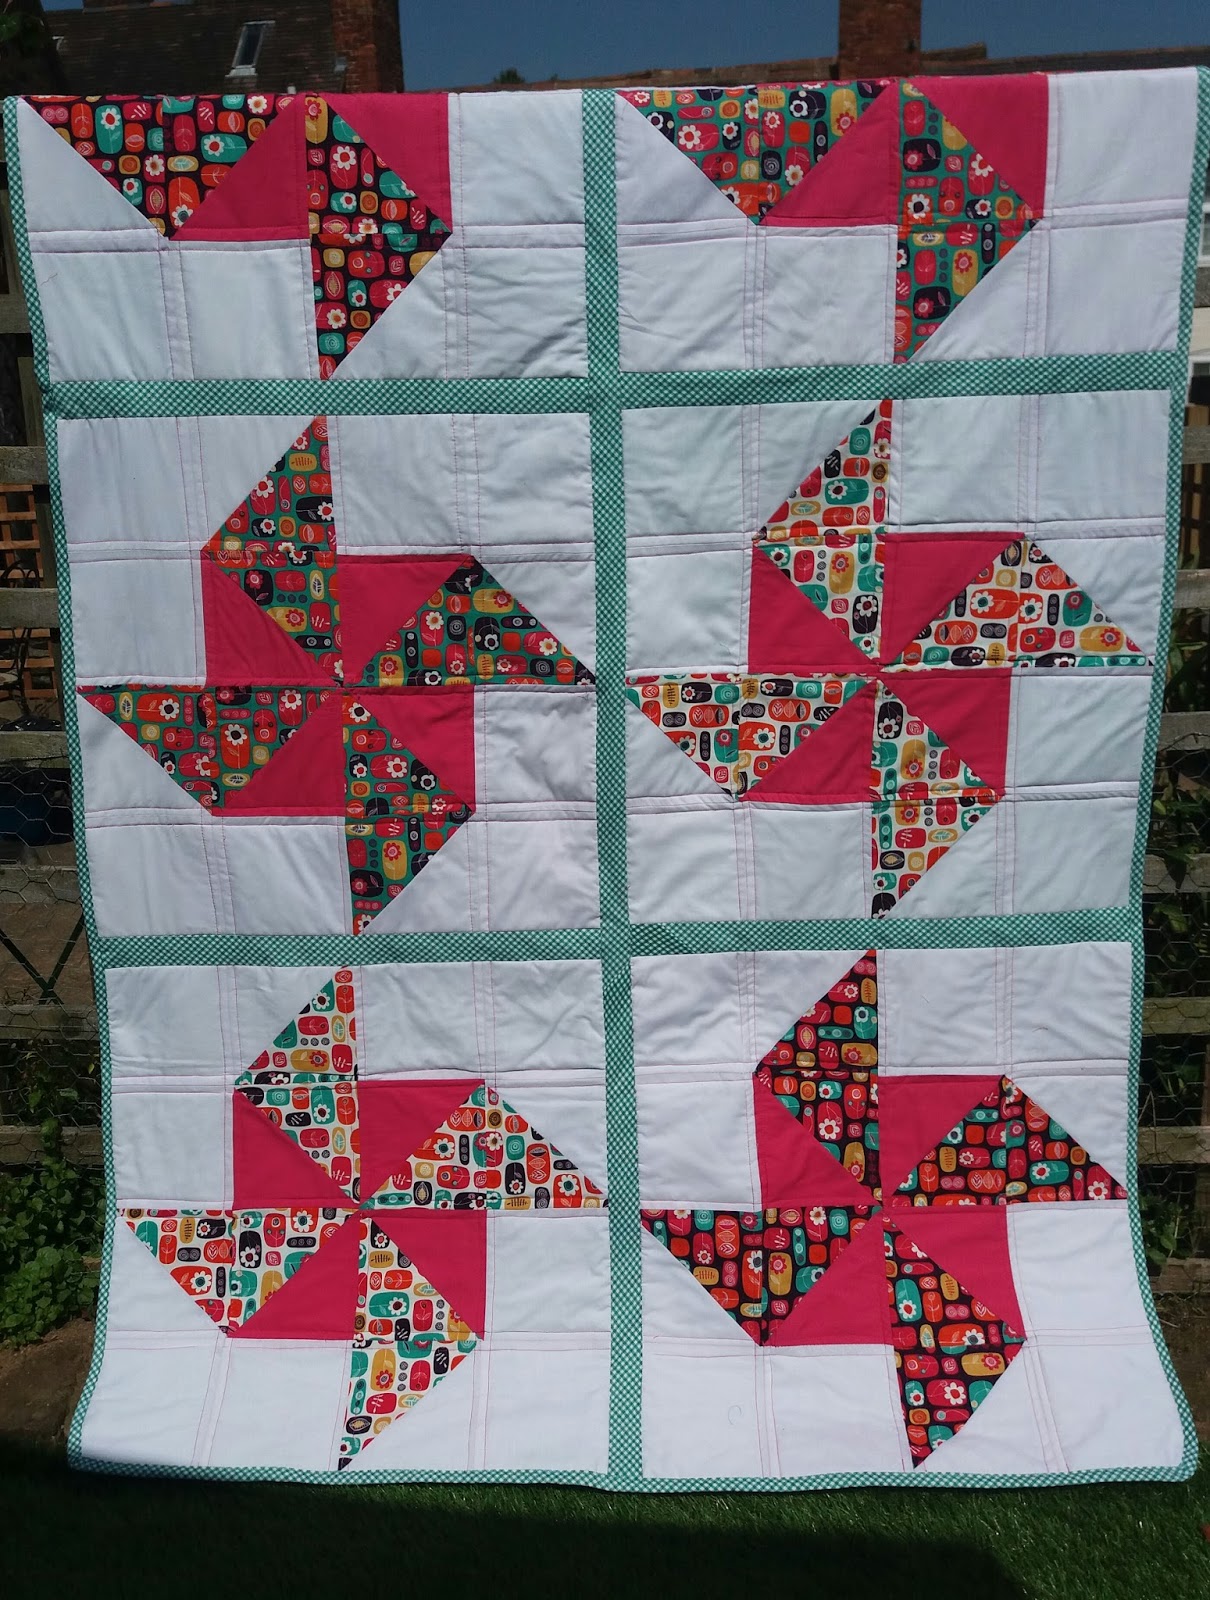
Lay out the block in four rows to make the design. Sew each row together then sew the four strips together and give it a final press. To make a generous cot bed or small single sized quilt you need to make 6 of these pinwheels.


It has has been backed with pieces of cotton and contains safe wadding. The binding is ready made and picks out the jade green colour but you could choose whatever binding you like.


I used my walking foot for the first time. It made great quilting seams through the layers without any bunching. A brand new needle is also a good tip before you start.


Experimenting with solid colours in quilting allows the patterned fabrics to really shine and you really don't need many of them to make a statement. This fabric was a great retro choice.


This is a scheduled post as I am away on holiday. The fabric was sent to me by Minerva and the opinions are all my own.

Friday 25 May 2018

Sailor Top by Fancy Tiger Crafts

This month my Minerva sewing project has a real summer feel. I have wanted the Sailor top pattern by Fancy Tiger Crafts for a long time. It ticked a lot of boxes for me: it had sleeves, it came over my stomach, it had a flattering neckline, it had a style I see in shops a lot which I really like.


The fabric I chose deserves a thorough review. It is unusual and when you see it here, it has some details which you might not pick up from the website listing. This fabric is however really inexpensive at only £3.99 a metre.


Firstly it is worth mentioning that the applique design is not sewn to the edges, this is fine for me but you have to check you don't get them folded over if they are on the side seam. Also the circles are not all over, they are a border arrangement which makes for fun pattern placement.


The hem is over locked on a wave. Some pattern jiggling is required here. I was not sure at the cutting stage what I would plump for so I made sure I allowed enough to have the original edge as the hem or turn it up and sew across the circles. I cut a UK 12 and graded out for for more hip room (you can see that on the left hand side of the pattern). It is a modification I am always mindful of making.


The applique pattern also needs to be centred and well placed for a blouse, I didn't want to have two nipple circles! The fabric is a light cotton lawn and is a little see through but I have a white bra so all is well. It also comes in a strong royal blue.

Pattern wise it had clear instruction and was easy to follow. The neckline needs care and attention. I put mine on twice. The second time I marked the dots and notches (doh!) because I had too much gather on the sleeve and not enough across the back leading to Edwardian style sleeves and a tight feeling across my back. The second time was so much better and comfortable to wear.


Modifications

In the end I went for a sloping front to back hem line which sat just where I wanted in all the right places - that is why we make clothes for ourselves isn't it? I sewed the sleeve hem facings on the outside so that I could have the thread detail on show. 

I loved messing around with the different aspects of the fabric but if you get some, ensure you take your pattern placement into account so that you have enough yardage. A very successful pattern. 

In the meantime I made another without french seams to check the sizing. This one has a better fit around the arms and has been a hit worn with trousers and jeans before high Summer.


On this one I took a tiny wedge out of the back band to avoid a little gaping I had on the white one.


This fabric is a thicker cotton so it will have more outings during the year. I had been trying to use this fabric since last January when a friend gave it to me in a bag of unwanted haberdashery but never found the right pattern - I have now.


2018 Indie pattern thoughts
I really liked this pattern but it is a wallet buster. It is however a pretty timeless shape and style so it will get lots of use. The sizing felt right for me and the instructions were great. I am looking at the rest of the range - maybe one for my Christmas list! There is a free download for a jersey top if you are interested which you can find here which I am going to have a go at in Autumn.

We are off to France for a well earned break tomorrow for a week and the white one is now in my suitcase. Just off to find a portable knitting project for poolside relaxation. Thanks for dropping by Jo xxxxx

Monday 21 May 2018

Me Made May 2018 - Mission accomplished

I made it! Fourth time lucky, is that even a thing? I fulfilled my personal Me Made May 2018 challenge. It was tough but worth it in the end...

The story...

I made a WATG sweater last year out of the most precious cotton yarn - so soft and sumptuous. I wore it in St. Tropez, it was good to have it on the breezy boat trip...


BUT, this is me wearing it when it was fresh and new. I had purposely made the sleeves a little longer because that is how I like them but as the Summer nights lengthened so did my sleeves.

The weight of the yarn made them longer and longer until I eventually stopped wearing it because I couldn't chop tomatoes without the cuffs mopping up the juices off the chopping board! I did what I always do in these situations - I hid it under the bed.

On my most recent seasonal wardrobe swap over it peeped out from the drawer and made me feel more than a little guilty. I decided to re knit the sleeves, after all I liked the body and the high quality yarn.

Firstly I tried a quick fix. I re knit a sleeve with unravelled yarn however the wobbly yarn made for the most appalling tension.


I went through the process of unravelling both sleeves, stretching and washing the yarn in skeins ready to start over again. I knit a sleeve. Grr! it was still wrong. I had not done enough decreases to make the sleeves narrow enough and then ran out of yarn resulting in another wide, baggy, useless sleeve which was now too short.
I unpicked, unravelled, washed, stretched and tried again another time. 


This time I really was like a dog with a bone. The left sleeve was now on its fourth incarnation. I was so pleased when it was finished not just because the torture was over but it is back to being the summer knit I originally wanted. It may not look too different to you but it is so much lighter in the sleeves length and width.


Did I ever mention I am a capricorn? Stubborn as a goat me. Thanks Me Made May, a great motivator to use the worlds resources wisely. 

Jo xxx

Friday 18 May 2018

Fifi Boudoir Set

Thank you for all of your kindness and messages, they filled my heart. Just changing the scene on my blog today to something light and sunny that I had ready in the background - you know me never short of anything to show!

When I say this is my favourite indie pattern, I am not exaggerating. This is my fifth set: two I have made as gifts, one for me with long bottoms and another version I made using the top pattern to make a swimsuit hack. I love the detail which is such a joy to sew on the machine. The instructions give such clear seam allowances for each stage that everything just falls into place all with enclosed french seams.


The pattern is however a bit of a fabric pig by which I mean it gobbles up a large piece. To combat this you can use bought bias binding which saves cutting large strips out of your fabric on the bias.

The pattern does warn against fabrics with a stripe because the top is cut on the bias and the shorts on the straight grain but I got away with it in this background stripe. The fabric was donated last year in a fabric bag. 

I got a chance to use my bias binding foot which makes for a neat finish on the edging. Another foot used for my 2018 resolution list.


 An exceptionally pretty set for my Summer holiday suitcase which will be packed in a weeks time.


I did say I had been sewing a lot in the rainy Easter holidays!

Do you have a pattern you use over and over again? Jo xxx

Tuesday 15 May 2018

Deep Harmony Crochet Socks

I have been meaning to make these slouchy house socks for a while now since seeing them at Tales from a Happy House. One ball of Cygnet yarns BOHO spirit needed to be made into something that would show off the colour runs and this pattern by cherry heart was perfect.


It comes in lots of colourways but I really liked this one called 6283 Harmony. It seemed like fun.


I had to make the socks a little shorter in the ankle than the pattern suggested to get the pair out of one ball but the yardage was great. One ball has approx 240 metres


These are going into my Christmas box for someone to watch a holiday film in front of the fire. 


It is with a heavy heart that I have to let you know that my dad passed away on Sunday from a long battle with cancer. We sat by his bedside for long periods of time over the weekend at his home. I meditatively made a second pair of socks during the long hours. It calmed my soul to crochet. This colourway is called Deep which was a fitting metaphor. These are on my feet now giving me comfort. 


I find it hard to process sympathy but if you would like to comment with a few kisses xxx that would be such a nice gesture.
I am just going to put my feet up now for a few weeks.

Thanks. Jo xxx

Friday 11 May 2018

Not a knitter?

Ever tried your hand, or should I say arm, at arm knitting? I needed a fast way to share a yarny craft experience with some non-knitters on a course I am running at the moment. It was quick and fun to do with no equipment requirements what so ever.


I watched a Youtube video here and chanced my arm. It was easy to make using Cygnet metallic seriously chunky left over from my girls hats. I ran the yarn twice to get the bulk required and used every last inch.


Out of the eight people at the class, six made scarves and the other three, who had babes in arms, made pom poms. I did not account for the fact that some people would not have both arms available!


Here are a couple of willing volunteers. They made them in about 35 minutes having never made anything before. They were very proud. The red one got a bit pulled as she kindly held a baby for another member of the group - the baby liked the feel of it too but the  tension of this knitting soon finds its place again. Arm in arm we helped each other along.


The more observant of you may have noticed that I have finished my crocheted dress... more on that later.

Can I twist your arm to have a go?
I am all out of arm idioms. Chat soon. Jo xxxxx